
The Specs
Courtesy of Revolution Gear and Axle
This is one of the most important parts of a setup. It’s also the only truly measurable part of a differential setup, which can give you confidence because you can control it. Print our organizer sheet to keep all your measurements in a place that’s easy to read and keep track of.
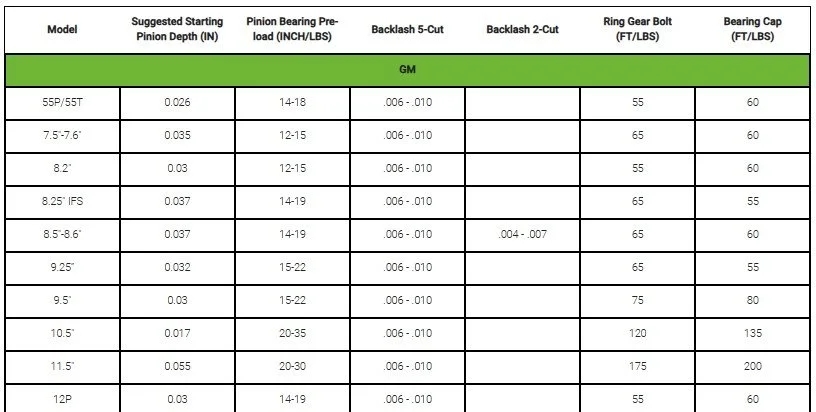
Every differential has it’s own specific numbers to follow, and there are a few places you can find that info. Revolution Gears has a few great resources that I like to reference. Click HERE to see their full chart of pinion depth, pinion preload, back lash and torque specs for all the common diffs. Find the specs for the differential you’re working on, and write it in the dedicated spot on our organizer sheet.
In the “Differential Tools” post, we discussed briefly each tool and what it’s used for. This step is when you have to know how to use these tools. We’ll make some separate posts and videos showing how to use the tools. For now, we’ll talk about the meaning of these specs.
Pinion Depth
This is described as the pinion shim thickness used to get a good pattern. If you are regearing a complete diff, you can remove the old pinion shim (by first pulling the bearing off with a clamshell puller) and then hold on to the shim under it. The original shim is always a good starting point for a regear. If your diff came empty or the shim was destroyed, you can reference the Revolution chart linked above to find the recommended starting thickness.
Final pinion depth will be determined by examining the gear mesh pattern.
Keep in mind for removable pinions diffs like in the 14 bolt, the pinion shim goes inbetween the pinion casting and main differential housing. So the shims have an opposite effect on pinion depth compared to a traditional behind the pinion gear style. Adding shim to a traditional pinion pushes it closer to the ring gear. Adding shim to a 14 bolt drives the pinion further from the ring gear.
Pinion Preload
This is the resistance of the pinion gear created by “loading” the bearings with a force that pulls them together. You create the force by tightening the pinion nut and therefore closing the distance between the inner and outer pinion bearings. The closer together they are, the more they are preloaded.
We measure preload as torque, in inch-pounds. This is not the break-away torque required to get the pinion rolling, but the amount of torque required to keep the pinion turning. Always keep this in the spec range.
Pre-lubricate the bearings with gear oil before measuring preload.
Too little pinion bearing preload means under force such as heavy acceleration, shock load to the tires/axle shafts, or heavy deceleration, the pinion gear will be able to move in and out slightly toward the ring gear. This movement can cause major damage like broken gear teeth, broken carriers, broken everything.
Too much pinion bearing preload will overwork and overheat the pinion bearings causing failure and damage from heat.
Backlash
This is the amount of play between the ring and pinion gear faces. It’s measured with a dial indicator in thousandths of an inch. You need backlash to allow for slight movements in the gears and expansions from heat.
Back lash is always set in the suggested specifications. Changing it within that range can slightly change the gear pattern which is sometimes desired.
Too little or too much backlash can cause damage between the gears. Always keep this in the spec range.
Ring gear bolt torque
This is fairly simple, as every fastener in a diff has some sort of torque spec. Ring gear bolts are a one-time use item as they may stretch when torqued to spec. It’s recommended to completely degrease the ring gear and bolts first. Then use loctite to lube the threads and add a layer of defense against them possibly backing out. Carefully hold the carrier in a vise or press while torquing the bolts in a star pattern.
Bearing cap bolt torque
Very similar to ring gear bolt torque, however these bolts are reusable. They need to be torqued properly to ensure the carrier bearing races are tight enough to not have play, and to maintain their original shape under load.
Overtightening will cause failed bearings.
Under tightening can cause spun bearing races and gear damage.
Pinion nut torque
Not necessary on all differentials, but some have a spec for this. Any diff that doesn’t use a crush sleeve for pinion preload will likely require a certain torque spec. These are easily found on Google. For example, the Dana 80 pinion nut spec is 450-500ft-lb of torque. Most crush sleeve eliminator kits suggest between 100-150ft-lb of torque. Crush sleeve applications typically don’t have any spec for this as you simply tighten to achieve proper pinion bearing preload.
Carrier bearing torque
“To measure carrier bearing preload, you will first take the pinion preload and write that number down. Next, install the carrier, torque the caps, and then measure the preload of the entire assembly. You will then subtract the pinion preload from the total preload, and multiply that number by the gear ratio.
Example, if your pinion preload is 20 inch pounds, and the whole assembly preload is 30 in pounds, the difference will be 10 in pounds. If you are installing a 4.10 gear set, you will multiply that by the 10-in pound difference between your pinion preload and your full assembly preload to get a carrier preload of 41 inch pounds.” — Bryan Mize - Gear Guru! Check out the Facebook Gear Install Technical Group that Bryan runs.
Too little preload will cause bearing failure, gear mesh problems / failure, and worst of all - gear deflection. This means the whole carrier/gear moves slightly which changes the mesh location between the pinion and ring gears. Deflection is a common reason why gear teeth break.
Next up, we will discuss gear mesh patterns!